Hi Crafty Friends! Thanks for stopping by my blog! I have a post today with some details of my DIY filming set up in my craft room and some of my other fave set-ups and storage ideas of my craft room - hope you enjoy it! A lot are budget ideas which I love - low cost, functional organisation is my thing!
This post is not sponsored by these companies - just love their products!
My first mention has to be my blue bottles on my window sill. They are so pretty and I do love the color pop it provides to my window view. They are bottles I have found along South West Western Australian beaches and also from 2nd hand shops over a number of years. Some are clearly very old and I wonder if they could 'speak' what stories they would tell!

My filming set up is quite simple. I film all of my Youtube videos on my phone (iphone 8 plus). I edit and do the voiceover on the imovie app on my phone also - it's quick and easy and quite intuitive to use. After working on my editing and voiceover in imovie, I save the video to my phone camera roll. I have the Youtube studio app on my phone and I simply upload my video from my camera roll to my Youtube channel. I finish adding description and other touches on my desktop computer through Youtube Studio. It's a pretty quick and simple process all up and I taught myself how to do it so that makes me think anyone could do it! hehe!

Last year, I purchased an
Arkon Mount from Arkon Australia (pic above) - it came in a pack which included the stand, a tablet mount and a ring light. I originally used the mount alone (it comes with a phone holder attachment) standing on my desk and bent in an arc so that my phone was over my workspace, but found that when ink blending my table would shake slightly (causing the stand to shake) and effect the video quality. I decided that a ceiling mount was required!
I enlisted my hubby and we headed to
Bunnings hardware store with the base of the Arkon Mount. I found some aluminium U type tracks that were the perfect size for the mount base to slide into and purchased two lengths. I then had my hubby screw these into the ceiling where the roof beams ran. This means I can slide my Arkon mount in the tracks and position the mount over my desk where required. I can remove it when not filming it and stand it in the corner out of the way! It's such a great solution!
Other craftroom faves are my
Ikea cabinets (Kallax), LINNMON table top and ALEX unit drawers.
I bought some storage bins and containers from Kmart to complete my craftroom including the:
Desktop drawers (drawers removed and base tipped onto end to hold cardstock)
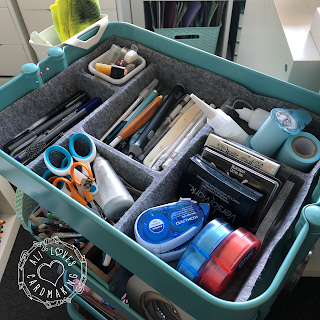
Below I have a picture of the Felt Tray (slightly trimmed edges to make it fit) from Kmart in my Raskog trolley from Ikea. This trolley sits snugly under my desk, rolls out for me to use my frequently needed tools and I put them straight back into their place when done.
I have purchased my Fiskars paper cutter and scissors from Spotlight too. My
Kokuyo roller adhesive and refills are from Officeworks and so is my white 250gsm card A4 packs (color laser copy paper - either
Mondo or Color Choice are great for card bases and Copic coloring on).
The display cabinet I have some of my fave cards/creations on is one I purchased from Spotlight some time ago.
Hope this post gives you some budget ideas for your own craft room!
Ali xx


2 comments
Beautiful space ali!
First off...your crafting space is lovely! How inspiring and I'm sure it's a great place to craft. I have a question about the FELT DRAWER DIVIDERS that you show. By chance, do you have a way of sending me a link to where I might be able to find them online? I appreciate your time and hope to hear from you. Thanks again and as always, happy crafting!!!
Post a Comment