Hello crafters!
Thanks for joining me for another of my Reverse Confetti Posts - My time as a Fetti Friend is nearly at an end and it's been so much fun!!!
Today I'm bringing you this Star Effect Card - the effect of the cross-over pieces in this card perfectly mirror the tee-pee shape and also trees in the Greatest Adventure Set. Warning though - this post is photo heavy - I wanted to show you the set-by-step process. If you'd like to watch a good Youtube video of this card technique - I watched Dawn Lewis' video ( Star Effect Standing Card tutorial).
You will need a large (6"x6") square envelope to post this card.
- Start with 1x piece of 6"x6" card and 1 x 6"x6" coloured paper (I used the gorgeous paper from Cue The Confetti).
- Cut both pieces down to 5" x 6"
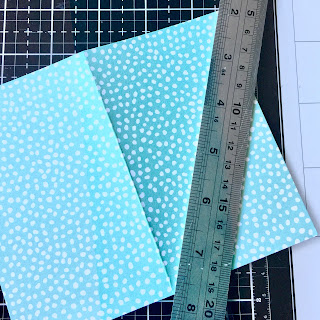
- fold the patterned paper short-side to short-side (to find the middle). Cut the patterned paper down the centre.
- Then cut each half top right to bottom left & top left to bottom right (as shown below)
- Cut the plain card piece to one corner and again to the other corner as shown below.
- The pieces you should have are shown below
- Cut a thin strip from the 2 'straight' sides of the patterned paper to make them slightly smaller than the plain card triangles.
- Stick your patterned paper pieces to the plain card pieces.
- Assemble and adhere the two separate triangles as shown below (I used my cutting mat to make sure the angles were all even).
- Fold the larger triangle together and cut a slit (measure up the angle edge 2" and cut down 3/4". The crossed triangles then 'sit' in this slit.
- By folding the back piece slightly the card stands as below.
To complete the card, I stamped out the images from Greatest Adventure and coloured them with copics, cutting them out with the corresponding dies.
- I die-cut some trees from patterned paper and added them to the cute scene.
- When the back panel is bent slightly, the card stands like a "star".
Hope you enjoyed this tutorial and that you try your own version soon!!
Ali xx


1 comment
This is pure AMAZING. I love your creativity!
Post a Comment